Don’t you just love beads! I could spend hours in a bead shop, adding to my stash. So many colors, so many canvases, so little time. Where to begin….with the basics, I guess.
Beads come in several sizes. In needlepoint, a number 11 is the most commonly used seed bead. There are other specialty beads, such as bugle beads, which are long cylinder like beads. Larger completely round beads are also used by some needlepointers. All are great and serve their purposes nicely.
A good needle is essential. I like the Sundance Beads beading needles. The hardest part of beading is threading the needle!
Customers are always asking what kind of thread do you use for beading. Truthfully, I must admit, I use lots of different threads. I like The Collection’s Braided Bead Thread, available through your LNS. Sundance Beads makes wonderful beading thread in a large variety of colors to go along with their extensive line of beads. I also use invisible sewing thread from JoAnn’s, as well as embroidery floss.
The thread you choose can have an effect on the color of your bead. For instance, if you are using a translucent bead and want the color to remain unchanged, use a thread that is clear in color. If you want to intensify the color of the translucent bead, match the thread to the bead color. If you want to alter the color of the bead slightly, play with the color of the thread. For example, if you are using a translucent yellow bead and you want it to appear slightly peachy, choose a peach toned thread. It will give you beads just a hint of color. This is fun just to play around with and see what happens, you might like what you try.
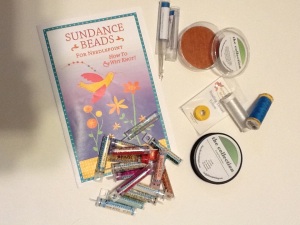
How to keep beads from ending up all over the chair while you bead…..that’s a different story. I have used the tacky bob and the sticky side of tape. Another choice is from The Collection called the EZ Beader (the round wood item in the first picture). It is a nice piece of wood with a sticky top to hold your beads and magnets on the bottom to attach it to the canvas you are working on. I have a customer that took felt and glued it to the inside of jar lids, inventive, inexpensive and effective. Others prefer a small bowl with the beads in it. To each her own. Me, I love toys, so the EZ Beader is my best friend when it comes to holding beads.
Now you are ready to start beading. I always knot the end of my doubled beading thread and bury it in some nearby stitching. I like to try different stitches when I bead, however, the basic way to bead is tent stitching. Nandra Hotchkiss and Cassandra Prescott of Sundance Beads wrote a wonderful little book called Sundance Beads, How To and Why Knot! It is available through your LNS. It is a book filled with helpful hints, bead descriptions and great stitches for beading.
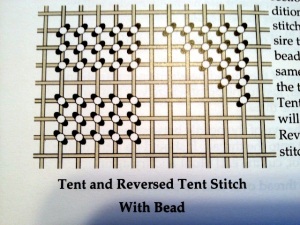
The above picture is from Sundance Beads How To and Why Knot! book and it illustrates how to bead using tent stitch. The beads will lay on the same slant as your stitch. To get your bead to lay vertically, I come up through the bottom right hole, add my bead and go down directly above the hole I came up in, crossing a horizontally thread. Then, I come up in the hole directly to the left of where I came up the first time, this time I go through the bead and then back down directly above that hole, again, crossing a horizontally line.
Another technique in beading is basketweave beading. This gives your beads a vertical direction on the threads that lay horizontally and a horizontal direction on the threads that lay vertically. It is a wonderfully cool look for objects like hearts, circles, packages and lots of other things. Don Lynch of Associated Talents uses this technique and has great directions on the Associated Talents website – http://www.atneedlepoint.com/guides/HE-801-GUIDE.pdf. You can see the technique on the hearts on the canvas and the directions are on page 2.
One of my favorite ways to bead a large area, is to use skip tent stitch , filling in the empty holes created by the stitch with beads. It is easier than stitching every hole and the beads look lovely laying in nice, neat rows.
The other question I am frequently asked is how secure are beads on needlepoint. If beads are secured properly, they will be fine. I have several of my great-grandmother’s beaded evening bags. She didn’t just look at them, she used them. Now, I don’t really use them, I mean wouldn’t I look ridiculous showing up on the lacrosse field or at a field hockey game with a beaded evening bag. But, one day, I will use them.
There are several ways to secure beads to your canvas. The first way is to stitch them twice. Yes, twice, not just with doubled thread. After attaching the bead, go back and repeat your stitch, going through the bead a second time.
The second way is called “lassoing.” This technique is done by attaching the bead with your doubled thread (always double your thread). When you have completed your stitch to attach the bead, come up through the canvas again at the same starting hole, split your threads and lay them around the bead and then go down through the canvas again. This creates a lasso stitch around your bead on top of the canvas.
Another way of securing beads and also creating a line or curving line, is to tent stitch your beads. After you have a few beads in a row, come back up through the first starting hole, go through a few (3) beads or so and then go back down through the canvas. Repeat this process every 3-5 beads or so. You can get the illusion of curved lines using this technique.
Beads make great embellishments to canvases and can be used on most canvases if secured properly. They can add interest, dimension and depth to a canvas bringing elements to life and adding texture. You can experiment with other stitches and beads, you may find one you like. The idea is to experiment with something new, you don’t learn unless you try something.
So grab some beads, a good needle, ample light and in my case a strong pair of reading glasses, and try it for yourself.
Happy Stitching!
Kristine


Your extensive knowledge of beading techniques is impressive! I can’t wait to begin beading.
Glad you are excited to start! Thanks for reading!